My New Alphabet Art Journal - Calligraphy Practice


So  I've decided to practice my Calligraphy more often.  To that end I am working on an Alphabet Art Journal.  This way I get to play with a lot of techniques and get a little practice in.  For A I have chosen the word Angel.  I used my Bombshell Angel Stamp set (all time favorite Bombshell Stamp) and colored and fussy cut the little Angel/cherub he is of course shooting a heart.    The clouds are Memory Box(found my missing Puffy Clouds Die but not before I purchased a second set, UGHHHH, I digress).  And I practiced the word Angel a lot before putting it in the journal.  Oh my am I out of practice.  This will be a good excercise for me and hopefully I will improve and be back to writing calligraphy with ease when I get to Z  OMG Z.  Not going to panic it will be a slow process.


Bombshell Stamps Fabulous Friday Tutorial

I'm over at the Bombshell Blog today with a tutorial on creating your own Faux Snakeskin Enjoy!
 
 Start with a Texture Disperse stencil.  Some Distress Inks light brown to black with a ink tool or two.  Perfect Medium Ink and Perfect Pearls in gold and copper.
 
First apply the lightest brown here Pumice Stone to the cardstock base.
Tape the stencil over the cardstock and begin applying ink working with layers of browns in a V shape down the stencil.  Here I used Frayed Burlap and Brushed Corduory.
Continue adding color getting darker here applying Walnut Stain & Black Soot.
Remove the stencil and clean it before moving on to the next step.
Now replace the clean stencil offset over the inked piece and sponge the Perfect Medium over the stencil.  Remove the stencil and clean it once more since we are now done with it.
 Now brush on the gold and copper Perfect Pearls in a V strips down the piece.  Brush away excess.
Your Faux Snakeskin is complete you can cut your piece down and add it to your project.

 For this project I used All My Heart and Banner Sayings colored with Copics to match the background.

Thank You so much for stopping by have a great day!

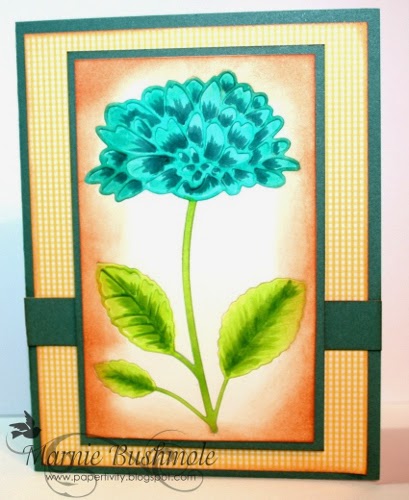
Delightful Peony

Good Morning over at the Memory Box Blog today I am sharing a card from my Copic class yesterday.  I love how the Delightful Peony die works to demonstrate and practice coloring techniques.   Now I'm sure Peonies will never be teal blue but that is the joy of being able to color your own you can make them any color you can dream up.  I particularly like this color combo.  A few Copic colors BG13, BG15, BG18, YG01, YG23, YG17 some Distress Tea Dye ink for aging and this is what you get.

Thank you for stopping by have a Great Day.


Copic Markers For Copic Class Monday


It's almost time for Copic Coloring.   In response to the color list question here you go!
 
0
Warm Greys from 0 - 7 any in between here
Y13, Y15, Y18
YR23, YR27
YG21, YG23 or YG25, YG17
BG13, BG15, BG18
RV21, RV23, RV25


Let's Go Shopping - Discovering Die Cuts - Memory Box Dies


Good Morning!  Over at the Memory Box Blog again today.  It's time to go shopping one of my favorite things to do.  So for the Discovering Die Cut Class this month I have created some shopping bags.  The first is the iconic brown bag and the second is a shopping bag full of amazing new shoes.

Products used -
Gift Bag Die 98660
Alphabet Soup 98795
Pretty Pumps 98810
Platform Pumps 98805
Papers Mango Gingham & Bubblegum Moroccan

Hope you get a chance to create some shopping bags of your own.  The possibilities are endless.  Have a Wonderful Day.
 

Bombshell February Sketch - Hearts Treasure


Today we're using one of Kathi's fabulous sketches for this months Bombshell Sketch Challenge over on the Bombshell Blog.  This month I've used Mermaid Treasure, All My Heart & Banner Sayings.  I colored everything with Copic's and masked everything off then airbrushed the background with Copics as well.  

I hope you get a chance to play around with the sketch be sure to post a link to your card over at the Bombshell Blog for the opportunity to win some stamps!  Woo Hoo.

Have a great day!


Doing Some Napkin Art


For a long time I've done Napkin Art I just love the beautiful 3 ply napkins you can get at some of the Home Stores.  Way to fancy to wipe my hands on so I like to turn them into altered art and cards and such. I have taught this a couple of times in my Terrific Techniques class @Craft Fancy in the past.  Maybe it's time for another class using these wonderful little works of art.   This one was created with a Floral Motif Napkin and a Rolled Flower Die from Spellbinders.  For the Greeting I used one of my favorite greeting sets from Bombshell Stamps - Banner Sayings.  It turned out to be a Fresh Spring card when it's not "fresh" or "spring" considering we are covered in snow and in the deep freeze.  I have more I will share again later.

Thanks for stopping by!

Hello Spring Wreath

Good Morning.   From the Memory Box Blog today.   Here's a little wish I have for an early Spring no matter how the groundhog reacted a few days ago.....   On this card I created a background with Distress Ink (Vintage Photo & Mustard Seed) then I cut out the Cascadia Wreath and Hello Script out of white cardstock.  I then colored the wreath with Distress Markers Flowers - Worn Lipstick, Leaves - Peeled Paint and a bit of Crushed Olive, Hello and Branches of Wreath - Gathered Twigs.  The wreath got cut in half and added to either side of the hello with any excess trimmed off.  I did add a little ivory pearls to the centers of the flowers for a bit of dimension.  Hope you like it.

Supplies Used:
Kraft Card Base
Other: White Cardstock, Distress Ink, Distress Markers, Ivory Pearls

Thank you so much for stopping by!  Have a great day!