Good Morning I'm over on the Memory Box Blog today.  Today I have a Christmas card for you using Christmas Ribbon Ornaments 98954 and Ornament Hooks and Caps 98958.   I first cut the die out of white and used the negative to build my card on top of the Cranberry Distressed Dots Paper.  For the outline of the ornaments I used Black Mirror Card and cut the ornament one more time out of Bluebird Distressed Dots Paper to insert in the decorative areas of the ornaments.   The hooks and caps are cut with Silver Mirror Card and the ribbon with Gold Mirror Card.  All of this is layered onto a blue card with a bit of blue ribbon.   This card does open to the side which adds to the elongated affect of the ornament grouping.   I had a lot of fun playing with and embedding the dies on this card!  I hope you get a chance to try it, it's a lot of fun!

Have a Wonderful Day!  Thank you for stopping by!

Bombshell August Hump Day Hop - Gilded


I'm so excited to join the Bombshell Stamps Hump Day Hop for August.  This month, the theme was "Gilded." In other words...metallic.  I had so much fun creating her.  I thought the Bombshell Angel should have Gilded Wings and a Gilded place to land!  The wings are cut from the Silhouette as is the Angel phrase.
The Bombshell Angel is colored with Copics and fussy cut then popped up.

Be sure to check out all of the other FANTASTICAL creations from the other players below!  Don't forget to leave some love!

Thank you for stopping by!  Have an AMAZING DAY!

Treasured Times Challenge #23


It's time for a Challenge on the Treasured Times Rubber Stamp Challenge Blog!  How excited are you.  The amazingly talented girls on Team B and myself were challenged to create projects using our Ice Cream Amber  designed by Jehanne Silva Freimane.  

This is what I created.  She is colored with Copic's, then I have added the dots with acrylic paint.  I did glitter her shoes because sparkly shoes are the best!  For the paper I went through my summer stash and found some old summer KI paper circa 10 years ago OMG I saved bits because I loved it so!  Then I added some Doodlebug and a bit of Crate Paper.  The flower is from my Maya Road wharhouse sale box, and the bow is a scrap from my scrap jar.   Be sure to check out all of the other amazing projects by my team mates on the Blog Here.  Challenge Details are BELOW !  Enjoy!


This next challenge is an "Anything Goes" challenge.
The challenge runs from August 23rd 8:00 am PDT - September 5th at 11:55 pm PDT.
You may use any stamp of your choice for this challenge. 
You may enter up to three items as long as they aren't old entries.
Link your project to your blog then Link Your Projects to this Post.....
The prize is being sponsored by Polkadoodles!!! 
The winner will receive the following digis from Polkadoodles.
Thank you Polkadoodles for sponsoring our challenge!!!

You definitely need a chance to win these amazing stamps!  SO COOL! 

Have a Wonderful Saturday!

Spooky House

Hello Hello! I'm over on the Memory Box Blog and today a Spooky House made from the Village House 98594. I'm getting into the Halloween Feel can you tell? I was so happy with my little trees. They came from the Harvest Moon Tree 99029 I cut out the center and one of the longer branches, they are really cute little trees. The clouds are stenciled in black Memento Tuxedo Black Ink with the Cloud Cover Stencil 88558 and the hills are made out of two shades of green and the Big Word Pop 99047. Finally a moon punched from yellow and some stars created with Stickles.


If you like this we will be doing this one and 3 more in my Die Cut Discovery class @Craft Fancy on September 4th.  Be sure to call and sign up today.

Have a most Wonderful Day! Thank You for stopping by.

Bombshell August Color Challenge - Love & Luck


The rules for the challenge are: To play, you need to use at least 3 of the colors from the palette (the more the merrier, though!), and you can only use black, white, and skin tones additionally. To play along be sure to link your project over at the Bombshell Blog Here.  You could win a FABULOUS prize.
   
Here is my take on the challenge,  I used the Love and Luck
stamp set and water colored a tag.  Then stamped everything in Staz On and colored it in with Twinkling H2O's I'm afraid my turquoise color on the leaves turned a little green when I added the gold over it, it was the same color as the Love & Luck phrase.  But I love how it looks very warn tattoey(not a word).  I did do some random stenciling with a Tim Holtz stencil and some sequin waste.  The metal bits are from my embellishment drawers attached with Glossy Accents.  

I hope you like it!  Have an Amazing Day!

Spooky Harvest Moon

  Harvestmoontree
Good Morning, I'm over on the Memory Box Blog today!  I have a very Spooky Harvest tree today.   This is the first card in my Die Cut Discovery class on September 4th at Craft Fancy.  There is still space in the class so call to sign up today.  

I first created a background with yellow Distress Ink for the moon and blue and black Distress ink in the Distressed Web Stencil-88580.  Once that was complete I added my die cut Harvest Moon Tree Die-99029, the extra hills were cut with the Big Word Pop Curve-99047 on either side.  Once everything was down A Bunch of Bats-98708 were put on flying all around the tree and moon.  To add a bit of sparkle I added some Stickles dots.  Like stars shining.

Hope you like it.  Have a wonderful day!
 

You Are So Kind – Impressionist Watercolor


Good Morning, I'm over on the A2Z Scrapbooking Blog today.  Today I am sharing a watercolor card.  I love when you use a solid image and just watercolor the openings in the images.  Today I did it a little different I overinked my Versamark pad and inked my image right away creating a splotchy affect when stamping and embossing with clear embossing powder.  I thought I wouldn’t love this one but out of the 3 I stamped after inking my pad this is the one I loved it is less perfect than the others creating that artistic affect.   Once the image is heat embossed just add watercolor or dye ink watered down to the open areas.  I recommend doing the background first then adding color to the flowers, stems and leaves.  This will allow for cleanup in the actual images with more water.  Make the project is completely dry before assembling your project.  The paper the image and greeting are on are Watercolor paper.  I love the added little button and twine.  For links to the products used in this project check the blog post HERE.  Or head on over to the A2Z Scrapbooking Store and take 15% off using the code marnie15.  Have a wonderful day.

Don’t forget to play along with our August Challenge the theme is Encouragement.


Fab Friday Tutorial - Inchie Background Making with Bombshell Stamps

I'm over on the Bombshell Blog today with a little tutorial on making an inchie backgrounds card with 
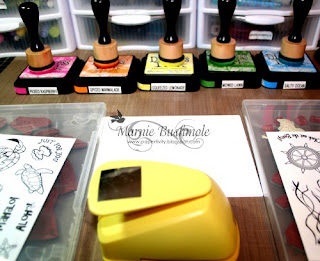
Bombshell Stamps.  It's late but I lost track of days of the week with School Prep!  I feel so bad and am so sorry!  Anyhoo, here are the supplies I started with.  Stamps Mermaid Treasure and Hawiian Girl, I chose a summer theme.  Distress Inks in Bright Colors along with their matching daubers.  A 1" punch and white paper.
I inked up the paper the solid Pink and Blue will be for mats for my inchies.
Then I stamped a ton of small images onto my rainbow sheet of paper with Archival Ink in random patterns,
Now punch 1" squares out of the stamped piece and cut 1 1/8" squares out of the blue and pink.
I was first going to put these on a plain white card however I decided I needed to pick up some more colors so I created the Yellow background with ink and stencils using the same colors.  So here I would like to note, it is easier to line up your completed inchies we build an L on the card.  Then everything gets attached according to those lines.
This is the completed piece.  Now to embellish.
I have added the Mermaid colored with Copic then foam taped and some coordinating Sequins as well as a bit of stickles.  The Mermaid is mounted on a small piece of Orange I colored with the same ink.
Here is a close up of the layers.
 
Thank you so much for stopping by today HAVE A GREAT ONE!

Raindrops Keep Coming

Raindropstrees
I'm over on the Memory Box Blog Today with a new card.  We've had a lot of rain here this summer it's good and bad.  The good is the garden is growning the bad is the weeds are too.  I have created the perfect rain scene with no weeds just rain and trees and grass, see no weeding!  I created the background with the Raindrops Stencil 88577 with clear embossing paste.  When it was dry I inked the background darker and used the Solid Arch 98992 die for the hill.  The trees are the Consenza Tree Border 98864 and then a few clouds with Puffy Clouds 98172.
Hope you like it remember you don't have to weed it which makes it the perfect rainy day!
Thank you for stopping by.  Have a great day!

So Excited Today

I get to share that I am now a part of the Treasured Times Rubber Stamps Challenge Team along with a bunch of talented, kind, lovely ladies.  I will be sharing my projects Here on their Inspirational Blog and also on their Challenge Blog Here.  They have the most adorable Rubber Stamps and Digital Images to create the most amazing projects. 

 I'm doubly excited to share my first card in my very first post on the Treasured Times Inspirational Blog today.

Today I got to use the Amazing Lily Mae Beach Comber by Jody Stacy

I love this little girl, so much fun to color up. I used Copics and once she was all colored I added a layer of Distress Antique Linen over her to age the paper a bit. It matched the Simple Stories 100 Days of Summer line of paper on the card. Once I put it all together I added just a touch of Stickles to the waves and such. Just a bit of sparkle. I love how she turned out.

I hope you like it and thank you so much for stopping by have a Wonderful Day!

Hiking Today

 Wild grapes.
 We went on a hike in the marshes a few miles from our house.  It was a beautiful day.


 Gorgeous butterfly.
 Pretty flowers.
 Cute girls walking.
 Marshes

 Queen Ann's Lace.
 The little dog got tired!  Poor little legs.

 Thistle the bees did not like me getting close to take the pictures.
The end head out the window on the way home.